In Angular, if data is the thing that makes an application come to life, then directives are the thing that makes actions, reactions, and interactions possible.
In the simplest terms, a directive is like a template function that you can use to make things happen. They may take arguments, do something with it, and generate a reactionary action on your HTML. Directives are things that let you attach behaviors to the DOM.
Here’s a quick primer on what directives are, the different types you’ll probably encounter in the wild, and when and how to use them.
The Super-Speedy Low Down on Components
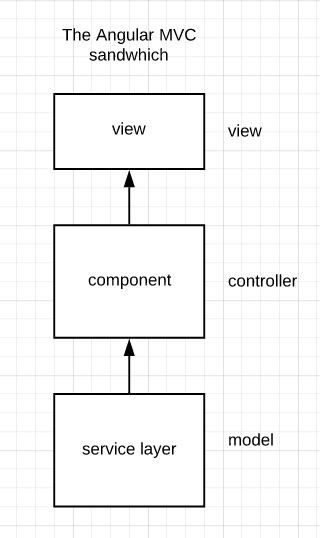
A way to think about your component is that it’s a container that acts as the bridge between your data and your view. It’s the controller portion of an MVC setup — meaning that it connects and renders your processed data from the service (aka model) layer.

When it comes to views, Angular is going to require something to help it figure out how, when, and where to do things. Structural and attribute directives are tools that Angular uses to connect a component to its associated view.
The Low Down on Structural Directives
Structural directives are things that determine how the final structure of a page looks in a rendered instance. They have the power to shape and reshape the final HTML structure by adding, removing, or changing elements.
Take a look at a common piece of Angular directive implementation below:
<div *ngIf="status" class="purchases">{{someTextHere}}</div>
In the case above, status
is set as a string, but it’s actually connected to a variable that exists inside the associated component and is expected to return a boolean
value.
From this value, Angular then determines if it’s going to show the host element or not. In our case, the host element is the div
that *ngIf
currently sits inside.
The *
is prefixed to ngIf
so that Angular knows what kind of behavior type it’s expected to perform on the host element. In the grand scheme of Angular, *
is actually a shorthand version of writing <ng-template [ngIf]="status"> your div here </ng-template>
When you don’t have a suitable host element available, Angular lets you use <ng-container>
as the placeholder. Then, you don’t have to resort to littering your code with <span>
that may have other things like styling and specially configured behaviors attached to it.
For example:
<p>Lyra walked
<ng-container *ngIf="hasCat"> with her cat</ng-container>
to school</p>
There are multiple structural directives available, and they’re actions that give your application the ability to perform choices based on the logic as dictated by the component.
ngIf
is a commonly used structural directive. The other two are ngFor
and ngSwitch
.
What About Attribute Directives?
If structural directives deal with how the DOM is displayed, attribute directives target the appearance or a particular behavior of an element.
By default, Angular has two built-in attribute directives: ngStyle
and ngClass
.
For ngStyle
, you can attach them to a host element like this:
<div [ngStyle]="{'background': '000'}">
This means that you can directly manipulate CSS within your template through Angular.
But why use ngStyle
when you could just use style=""
via HTML?
The quick answer is that ngStyle
lets you add functions that let you connect to your component, giving it additional abilities to process logic.
<div [ngStyle]="someFunctionInYourComponent()">
Alternatively, you can use style
itself to create logic on the fly based on a particular condition.
<div [style.background]="1>0 ? 'blue' : 'green'">
In the above code, the 1>0
portion is the thing that sets the condition. This can be any variable or value, as long as the condition itself evaluates to a boolean.
The second part ‘blue’ : ‘green’
gives Angular the result pathways to take. If true
, render the first option, and if false
, render the second option.
A similar concept exists for classes, too. While style
and ngStyle
deal with specific CSS, ngClass
gives you the ability to attach specific classes to the host element based on boolean
results.
<div [ngClass]="{'className': boolean, 'anotherClassName': anotherBoolean }">
How Does One Go About Writing Custom Directives?
While Angular’s built-in structural and attribute directives do cover a lot of potential use cases, it doesn’t guarantee that every potential instance will we solved via the available defaults.
That’s where custom directives come in. The skeleton of a custom directive looks something like this:
import {Directive, Input, TemplateRef, ViewContainerRef} from '@angular/core';
@Directive({selector: '[yourCustomDirectiveNameHere]'})
export class nameHereDirective {}
And now, if you want to use your directive, you can just use it in your view.
<div *yourCustomDirectiveNameHere="someConditionHere">
It’s also good to note that you shouldn’t use ng
as the prefix to your custom directive because that’s reserved for Angular defaults only. It’s good to have a prefix, but make it meaningful to your application.
When it comes to writing your custom directive, it doesn’t matter if it’s a structure or attribute directive. How you use it in the view, though, does change slightly.
<div [yourCustomAttributeDirective]="someCondition" >
The difference between a structural and attribute directive is *
and []
— where *
signifies to Angular a structural DOM change while []
deals with the properties of a host element.
As an alternative to writing out a custom directive code manually, you can also generate it using the CLI.
ng generate directive yourCustomDirectiveNameHere
So that’s basically Angular structural and attribute directives in a nutshell. There’s more to the topic, especially in the realm of how to create meaningful code for custom directives.
However, that’s beyond the scope of this piece and will have to be addressed in a separate and dedicated space.