The Ultimate Visual Guide to CSS Selectors

At some point in your software engineering career, you’re going to encounter CSS.
On a technicality, it’s not actually a language — but the rules and how it’s structured can be as complicated. There are discussions and community initiatives around clean CSS as much as there is chatter about clean code.
When developers learn about CSS, we mostly learn how to use it in a working state. It’s like figuring out how to get an Angular or React app working without actually understanding JavaScript.
Why?
Because most of the time, it just works.
The basic tutorials don’t often go into how selectors work, and if they do, it’s often quickly brushed over despite being one of the foundational topics in CSS.
Or it’s done in a text-heavy way.
Without further ado, here is my contribution to your deeper understanding of CSS selectors.
The Quick Short on Selectors
Selectors are part of the CSS that tells the browser which part of the code to target. Basic selectors target HTML tags such as h1, p, and img tags. When you target the root tag, any styling you apply becomes part of the “global” style.
This is the simplest way to select an element via CSS.
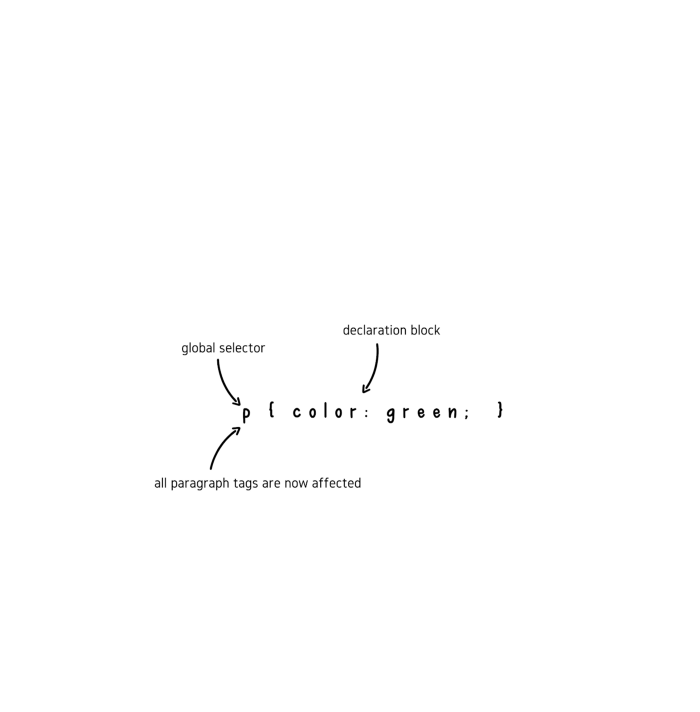
What a lot of developers new to CSS tend to do, especially when things aren’t going right, is add another selector rule block further down in the CSS file.
Because of the cascade, whatever is written gets applied in order from top to bottom. This creates an overriding effect and is not recommended as it creates junk code. This also makes it hard to trace the root cause of an issue.
When writing your CSS rules, have a property for a specific selector in a particular scenario in one place only.
This means that if you’ve already declared a p selector with a color attribute, you shouldn’t be changing it later in the file, unless it’s for a different state, such as :hover.
This will save you the trouble of tracing selectors and their properties as your CSS styling grows.
You can also target specific blocks of your HTML via class and ID selectors. IDs are expected to only be used once and nowadays, are often reserved for JavaScript hooking. Classes are often a more standard method of HTML blocks and are more reusable in nature than IDs.
Classes are declared via the class attribute in HTML and called by CSS using . as the preceding symbol. Selecting a specific ID is the same concept, where ID is the attribute and # is the preceding symbol.
Now that we’ve got that out of the way, let us begin with…
Adjacent Sibling Selection Combination
Let’s take a look at the diagram below.
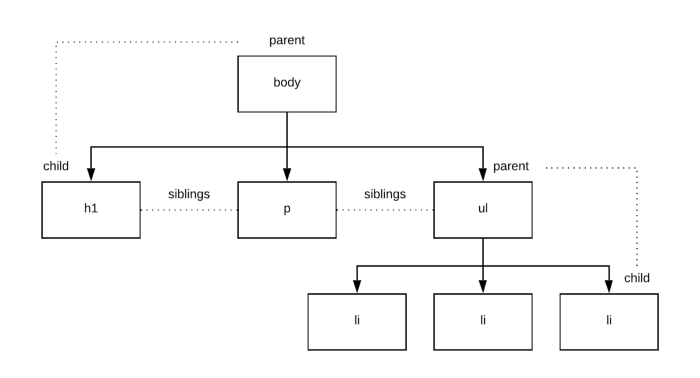
Most places generally begin with trying to style a single item — but what if you want to hit on certain relationships?
In the DOM, tags that sit directly next to one another are called siblings. This means that h1 and p are siblings, but h1 and ul are not. Siblings need to be right next to each other, or else putting down h1 + ul will hit on every possible ul that exists, regardless of proximity.
When you use the + sign, you can create selection conditions. It tells your browser to select adjacent siblings — that is, a combination pair of elements that sits directly next to another specified element.
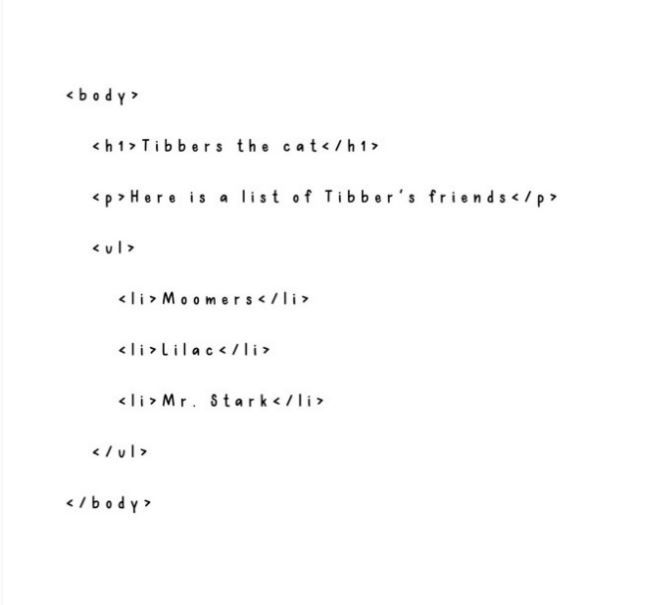
This theory also applies to ID and class selectors.
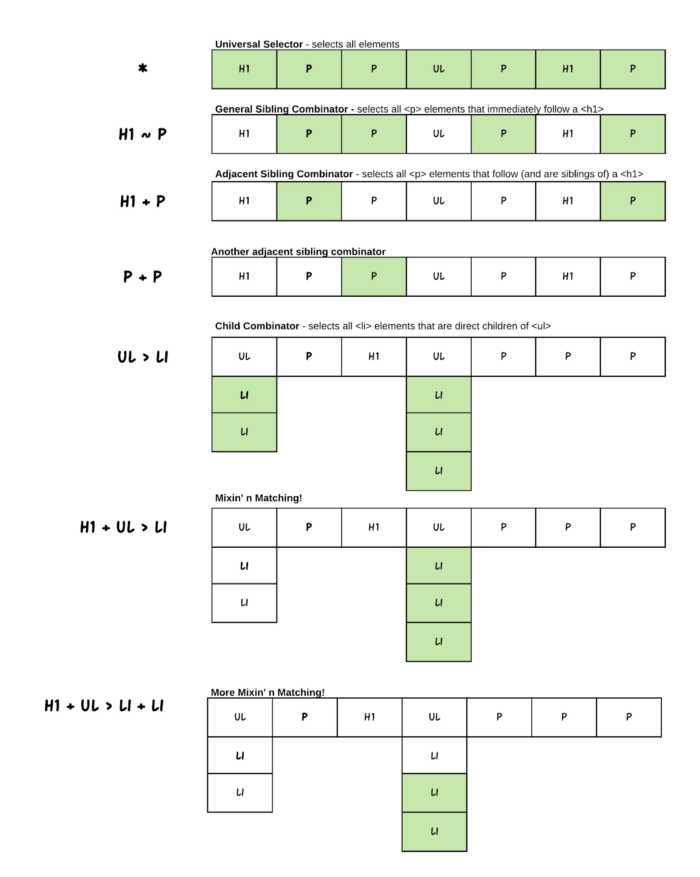
Child combinators select elements that are direct children of the target element. > is used to denote this condition.
Let’s take a look at how the rules are applied in diagram form.
Attribute Selectors
Attribute selectors target HTML through their attributes.
HTML attributes are specific to particular elements only and enrich the HTML with extra meta information. They are targeted through the target element followed by the associated data surrounded by [ ].
Here are some common and useful attribute selectors that are targeted through HTML attributes.
a[href*=”twitter”]— Targets<a>elements that have thehrefvalue that contains the word “twitter”.
Example: <a href=”http://twitter.com">Twitter</a>.
a[href^=”https://”]— Targets<a>elements that have anhrefvalue that starts withhttp://.
Example: <a href=”https://dottedsquirrel.com">Dotted Squirrel</a>.
a[href$=”.co”]— Targets<a>elements that have anhrefvalue that ends with.co.
Example: <a href=”awebsite.co”>Company & Co</a>
button[disabled]— Targets button elements that have a disabled attribute applied.
Example: <button type=”button” disabled>Click Me!</button>.
input[type=”submit”]— Targets input elements if they have a type attribute with an exact value of submit.
Pseudo-Elements
Pseudo-elements target the “space” before and after an element. The actual space doesn’t exist as such in HTML but CSS inserts an empty container, giving you a space to manipulate.
Let’s take a look at the CSS and where the content will be inserted.
.item:before { content: “icon.jpg”; }
.item:after { content: “anotherIcon.jpg”; }
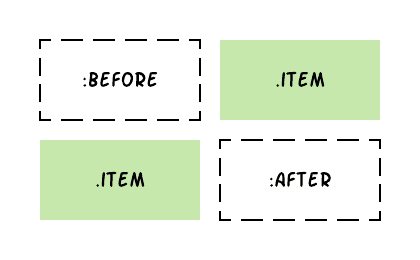
The :before and :after pseudo-elements are often used to display special preceding items such as icons. For pseudo-elements, the content property is required but can be left blank. They are treated like any other element and can be styled accordingly.
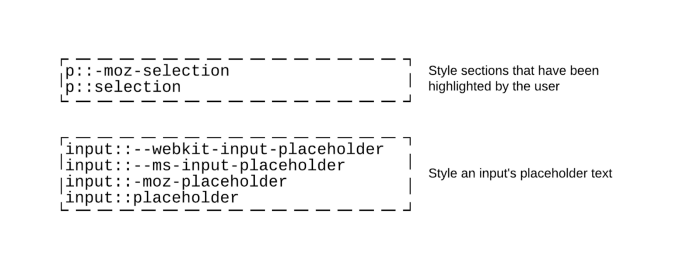
Here are two other pseudo-elements that can come in handy with <p> tags.

The following pseudo-elements require :: because they only work in some browsers and need the entire set for it to work properly. They only work on some because it’s currently being implemented across the broad.
State-Based Pseudo-Classes
State-based pseudo-classes target exactly what it sounds like — states. A state is a condition that an element exists at any point in time. For example, :hover is a state available in most tags, giving you the ability to style it when the mouse hovers the element.
Here is a table of state-based pseudo-classes:
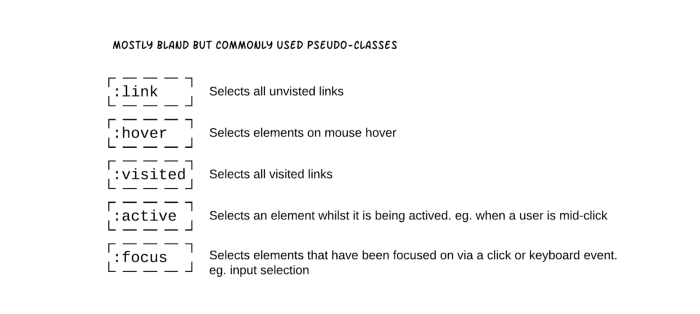
Here is an example of how you’d write the CSS.

Form and Validation Pseudo-Classes
Forms are everywhere. Styling them to look acceptable is a necessary skill every UI developer needs to be versed in.
Form specific pseudo-classes make this possible. Here is a cheat list of form and validation pseudo-classes for your reference, and what they do in terms of visual targeting.

Putting Two Ideas Together — Structural Pseudo-Classes
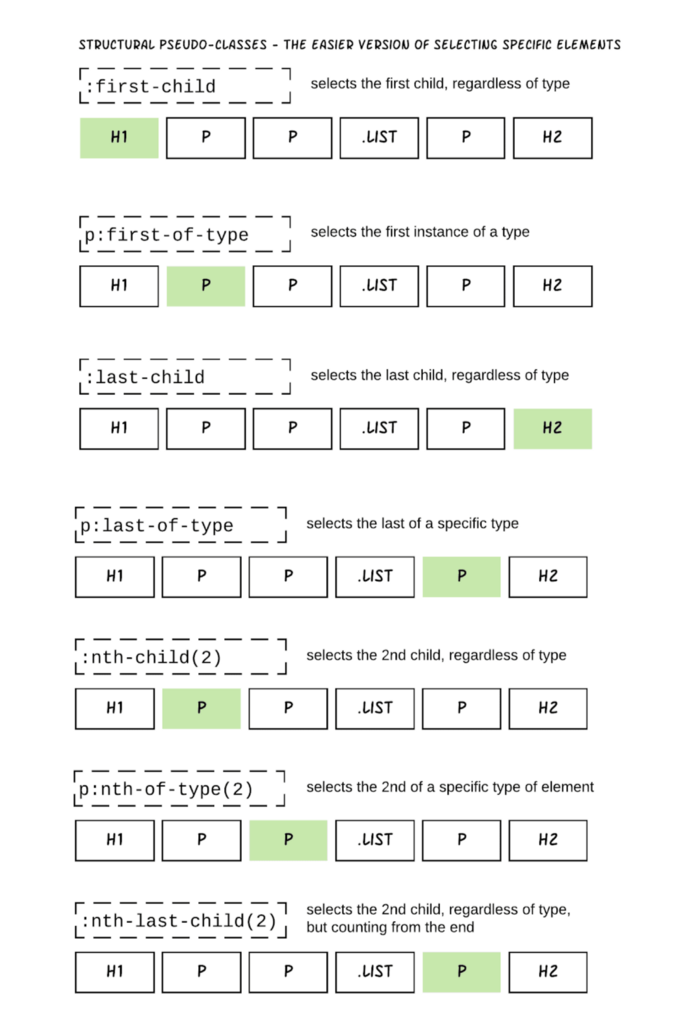
Remember earlier in the chapter, back to where you can select siblings by using ~, +, and >?
Well, you can also use structural pseudo-classes to select siblings and adjacent elements. Here is a concise list of how different available structural pseudo-classes work.
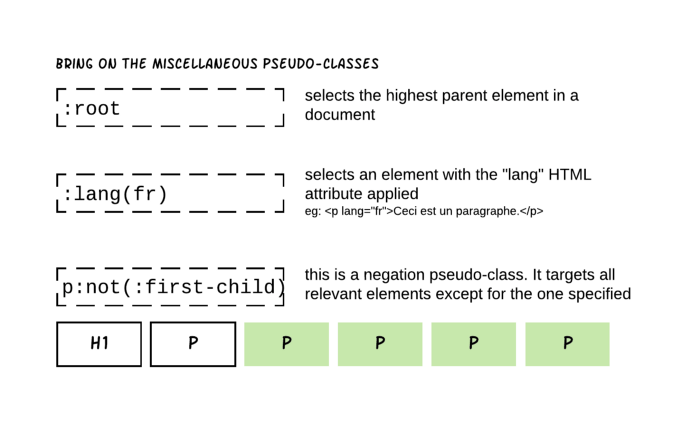
Miscellaneous Pseudo-Classes
Like everything in existence, there are also the stragglers that don’t quite fit neatly into a category. It’s still good to know of their existence nevertheless.
Sidestepping a Little With :target and #someLinkHere
In HTML, you can link content within the page without the need to refresh it.
You do this via <a> and the href property. When you put a # in front of the supposed link, it will look for the related ID inside the DOM and scroll your page down to the appropriate place.
The code looks something like this:
<a href="#sectionOne">Section One</a>
<a href="#sectionTwo">Section Two</a>
… some more code here …
<div id="sectionOne">some content here</div>
…
…
…
<div id="sectionTwo">some content here</div>
When you click on section one, the browser looks for the corresponding ID as set in the href part and takes you to that particular bit on the page.
When it comes to styling, :target lets you configure what visually happens once you select and navigate to the targeted link on the page.
So, your CSS could look something like this:
:target { border:solid 2px black; }
This will result in a border around your targeted host element (a.k.a., the div based on our example above). When you click on a different targeted element, the styling will be removed from the original and applied to the new target.
The Fun Side of CSS — nth-child Expression
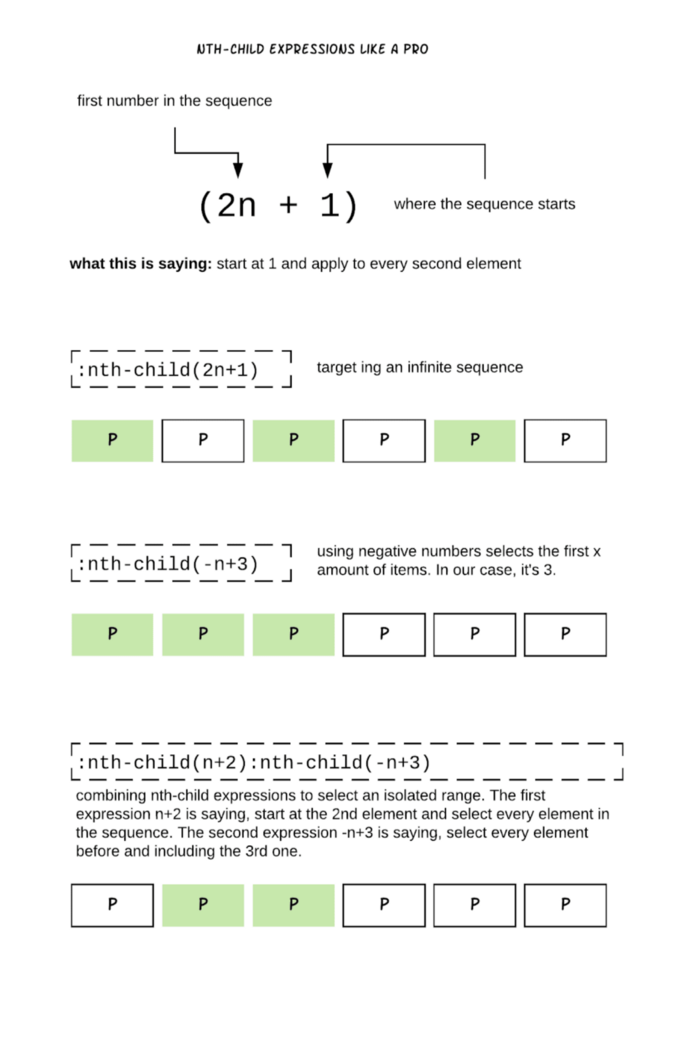
CSS may seem linear on the surface but it is equipped to perform condition-based selections. nth-child expressions are one way to achieve this without having to start playing with JavaScript or tap into the powers of your libraries and frameworks.
Here are some useful potential combinations and how to use them.
And that’s basically it for CSS selectors. I hope you found this piece useful, especially for future reference.


Comments ()